Pages

Wednesday, June 29, 2016

Birthday Cake Popcorn


Colors. Sweetness. Salt. Chocolate. Joy. In my opinion, these are all lovely things best served with sprinkles. Is that a weird thing to say? Probably. I'm gonna roll with it. But anyway, all those words can describe this popcorn too. It's a fun one. It's cutesy. 


I made this one night to eat while watching How to Get Away with Murder. If you watch it, please come talk to me because I have a lot of feelings about it. I finished both seasons in about a week and a half. So good. And wow, Viola Davis. I totally understand why she got an Emmy. So much raw emotion. This recipe is sunny and happy to offset the darkness and sadness in the show. It works out.


Birthday Cake Popcorn
Ingredients
6 cups freshly popped popcorn (you can use microwave or pop it yourself)
1 stick salted butter, melted
8 oz. white chocolate
1/3 cup yellow cake mix
1/2 cup M&Ms
sprinkles
  1. Toss the popcorn with the butter and salt to taste. Spread on a baking sheet with parchment paper.
  2. Melt the chocolate carefully, either in a glass bowl over a pot of boiling water, or in a microwave.
  3. Once chocolate is melted and smooth, stir in the cake mix.
  4. Pour cake mix over the popcorn and sprinkle with M&Ms and sprinkles.
  5. Let cool and enjoy.

Wednesday, June 22, 2016

Thai Chickpea Burgers


I grew up in a very carnivorous household. I'm pretty sure that the idea of a bean burger is downright offensive to my parents (hi Mom and Dad. please let me come home still.). As a result, I didn't try a bean burger for the first time until I was in college (desperate times in the dining hall freshman year). To my surprise, it was really good. I personally don't enjoy veggie burgers, but bean burgers are different enough that they don't disappoint my raised-on-grade-A-beef taste buds.


Am I saying that these will make you want to ditch meat forever? No. Definitely not. I wouldn't want to either. That being said, these are a nice way to switch things up and save a little cash. Just don't expect them to be like meat. They aren't. They're very different in both flavor and texture. But different is good. Trust me.

Thai Chickpea Burgers
Ingredients
1 can chickpeas
1 can canellini beans
1 egg
1/2 cup breadcrumbs
1/3 cup shredded carrot
1/3 cup fresh cilantro, chopped
1/4 cup peanuts, roughly chopped
sesame oil for cooking
buns

sauce (adapted from How Sweet Eats)
1/2 cup Thai chili sauce
1/4 cup rice vinegar
1/4 cup coconut milk
2 tbsp peanut butter
1 tbsp soy sauce
1 tbsp sriracha (or more/less, depending on your spice preference)

  1. Start by making the sauce. Combine all of the ingredients in a small pot over medium heat. Stir until smooth. Bring to a simmer and allow to cook for about 1 minute. Let cool, and sauce will thicken.
  2. Mush the beans using a potato masher or fork. If you want smoother burgers you can use a food processor or blender, but I don't mind minor chunks. It adds texture in my opinion.
  3.  Add the egg, breadcrumbs, carrot, cilantro, and about 1/2 a cup of the sauce.
  4. Form the mixture into patties. I made 4 but they were pretty big, so it's up to you. Sliders would be yummy! The mixture is going to be pretty sticky and wet.
  5. Add the burgers to a pan with a little bit of sesame oil over medium high heat. Cook for about 5 minutes on either side.
  6. Serve the burgers topped with the sauce and some chopped peanuts. Enjoy!

Wednesday, June 15, 2016

Bubble Bread


Hi there. Welcome back to Kimmie's Kitchen. Here's more of Carbfest 2k16. I'd apologize, but I'm not sorry. Not at all.

Did you guys watch the Tony's on Sunday? I don't ever watch award shows, but, like any good theatre nerd (even one who hasn't touched a stage since 2013), I was in front of my best friend's TV on Sunday night cheering every time Hamilton won. All eleven(!) times. I also cried during pretty much every speech. I'm not kidding. Especially Renee Elise Goldsberry and Lin-Manuel Miranda. Wow.

My current oven situation
But anyway, on to talking about this bread. It's so good. I'm a little embarrassed to call this a recipe, but here we are. It's basically monkey bread with chocolate, and if you're anything like me you'll agree that chocolate always improves food. This is the perfect thing to bake and then take to a friend's apartment late at night. That's what I did with it anyway. I highly recommend doing the same. 

Also, you can totally bake this in the little ovens we have in Infinity Hall. It's doable, I promise. As evidenced by the above photo. 


Bubble Bread
Ingredients
1 can refrigerated biscuit dough
16 unwrapped Dove chocolate promises (or you could use Hershey's kisses or any other little chocolate chunks)
4 tbsp salted butter, melted
1/2 cup sugar
1 tbsp cinnamon

  1. Cut each biscuit in half. Roll each half into a ball around a piece of chocolate.
  2. Blend together the sugar and cinnamon.
  3. Roll each ball in butter then in the cinnamon sugar to coat thoroughly. Stack in a loaf pan. Repeat until all balls are coated and stacked.
  4. Bake at 350 for 25 minutes. If the top gets too brown, cover with foil and continue baking. Enjoy!

Saturday, June 11, 2016

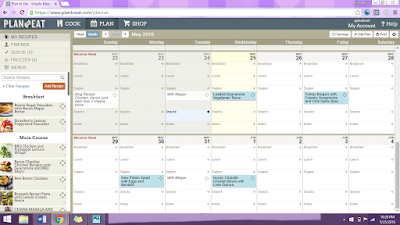
Plan to Eat


So. Let me tell you about this web service that I LOVE. This is Plan to Eat, and it's amazing. I don't know about you, but I am REALLY bad at grocery shopping. If I go to the store without a list, it's a mess. I would walk out with a gallon of ice cream, a few bags of chips, some soda, a package of chicken, and like three apples. Not only is this REALLY unhealthy, but I was constantly running out of food but also having other food that was going bad. It was awful. Enter Plan to Eat.

This little thing has saved me so much money. It lets me plan my meals a week (or more) in advance, and then makes my shopping list for me. Which is great, because I'm somehow bad at making shopping lists too. I don't know. I'm not a real adult. But it's great, because this way I can only make the food I'll need for the week, and it also helps plan cooking for the blog. Plan to Eat lets you import recipes from anywhere, then enter them into your little calendar. Seeing my full calendar gives me warm fuzzies inside. But um, planning is like that for me. It's not expensive, $5/month or $40/year, and it's definitely saved me at least $40 in food waste. It makes budgeting much easier too. Also, as a busy college student, this has definitely detoured me from eating out most of the week. Love.

These are my honest opinions and I was in no way sponsored by Plan to Eat.

Wednesday, June 8, 2016

Ombre Smoothie Stacks

Look, I have friends! 
I feel like a lot of my recent posts have started with me talking about how excited I am for summer. This one won't be an exception. It's still summer, this recipe is summery, and I'm still excited. So there. Happy summer. Enjoy a colorful smoothie stack.


Fun thing about this: I made it in Infinity Hall at UF, the lack of kitchen can't stop me. All you need is a blender, lovelies. A freezer helps get a pretty stack but it isn't required. We give you ice, which is a pretty key ingredient. You can handle this recipe, even if you live in the land of no kitchens. You know you wanted to buy a blender anyway (or even one of those cool Magic Bullet things).


Speaking of UF....I'm starting my senior year (or maybe it's already started, summer semester is confusing). WHAT? I honestly still have days where I wake up and have to remind myself that this is COLLEGE. It's weird because I don't feel adult or anything and I definitely thought that would've happened by now. But instead I'm just here, living my life. Maybe when it ends, I'll suddenly understand? But guys, I still feel 17 and I still feel just as much awe that I'm actually in COLLEGE. Please tell me I'm not the only one.

Ombre Smoothie Stacks
Ingredients
honeydew layer
2 cups honeydew, cut into chunks
8 oz vanilla yogurt (I used low fat)
1 cup ice

pineapple layer
2 cups pineapple chunks
1/2 cup coconut milk
1 cup ice

watermelon layer
1 cup watermelon chunks
1 cup ice
  1. Blend each layer individually, starting with the honeydew.
  2. Pour into glasses and freeze as you make each additional layer. When you pour the upper layers, be careful, but when they mix a little you'll get to see the ombre, so don't stress too much. Enjoy!

Saturday, June 4, 2016

The Metro Diner


The Metro Diner is a Jacksonville transplant, which has come here to Gainesville. I was really excited about this because I saw an episode of Diners, Drive Ins & Dives where Guy visited it. I know, my TV choices are questionable at best. ANYWAY.


To clarify, I didn't eat all of this food alone. I was with three other people. Be that as it may....you get a lot of food at Metro Diner. That hashbrown was bigger than my hand. Those pancakes were gigantic. And wow. It was all so good.


We didn't get it, but they also have chicken and waffles featuring half a chicken. I know. But yeah, everything we ate was really good and they serve breakfast all day, and that's a blessing, as far as I'm concerned. Go go go.

Wednesday, June 1, 2016

Pizza with Fried Chicken, Bacon, and Mac & Cheese

Say what?


Yup. You heard right. That's a pizza with fried chicken, bacon, and macaroni n cheese. Beer mac n cheese, that is. I know.


Did I go overboard? At least a little, right? I figured. But it's okay. This is worth the unbelievable carb fest. And I mean, according to my MCAT review book, carbs are really important. They fuel your body. And yeah, it's more complicated, but just go with it.

Speaking of which, I registered for the MCAT yesterday and aghhhhhhh. FREAKING OUT. Just a little. You know how it is. So um, September 10th. That's the magical (read: terrifying) day. There may be some correlation between the start of my MCAT studying and my developing a liking for coffee. These things go together, you know.


But it's okay. Because we have this pizza. This pizza isn't too hard to make, and is crazy and comforting enough to help you feel better after a long day of MCAT studying. It's also good to emotionally eat when you're angry about the treatment of mental illness in America. But um, that's another post. Aaaanywaaaaay.


Frat Boy Pizza
Ingredients
1/4 cup (1/2 stick) of butter
1/4 cup flour
1 cup dark beer**
1 1/2 cups whole milk
1 tsp salt
1/4 tsp pepper
1/2 tsp garlic powder
12 oz shredded cheddar cheese
1/2 box macaroni, cooked and cooled
6 slices bacon, cooked and crumbled
1/2 pound chicken tenders, diced (I got the ones from Publix)
1 pizza dough
1/4 cup shredded Parmesan cheese
  1. Make the mac n cheese first: Start out by making a roux. Melt the butter over medium-low heat, then add the flour, stirring. Once thickened and slightly browned, add the beer, milk, and spices. Stir.
  2. Continue stirring over medium heat until the mixture boils. Allow to boil for 3 minutes, then add cheese.
  3. Stir until cheese has completely melted.
  4. Carefully fold in pasta. Let cool.
  5. Shape pizza dough into and awkward oval or a better shape. Bake at 350 for 8 minutes.
  6. Remove dough from oven. Sprinkle with about half of the bacon and chicken. Add about half of the mac n cheese. Top with the remaining bacon and chicken, then add another layer of mac n cheese. This will make a VERY thick pizza. If it's too much for you, you don't have to add all of the macaroni, but it's better if you do.
  7. Top with the parm and put back into the oven for another 18 minutes, until the top in slightly browned. Enjoy!